Welcome to this online guide which will show you how to configure your Zoho Books organization with Hector. The main purpose of this integration allows the creation of invoices in Zoho Books directly from Hector loaners.
1. How It Works
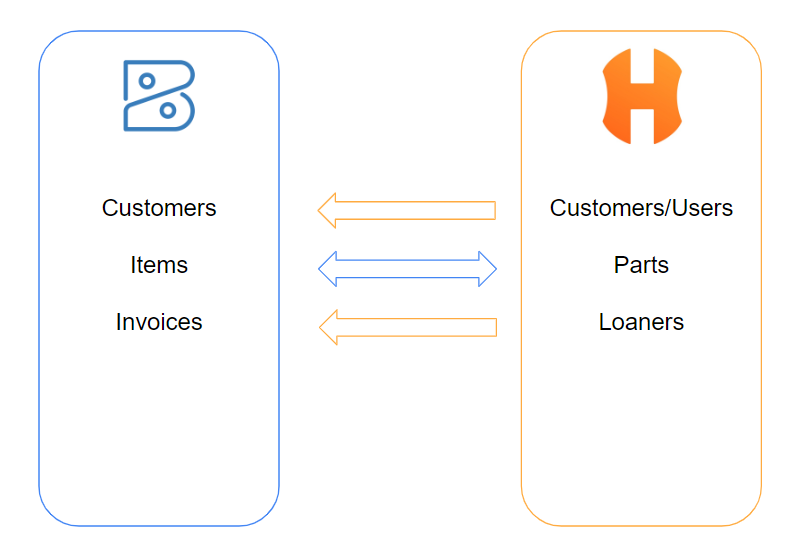
Firstly, the integration is a bridge between Hector and Zoho Books that goes both ways. This means that Hector synchronizes information from Zoho Books and back to Hector. The integration can be broken down into 3 main components: customers, items and invoices.
Customers
While configuring the integration, you will be able to choose which Hector resource you prefer using: Customers or Users. The chosen resource will then be imported into your Zoho Books automatically on activation as Customers.
Items
On the other hand, items are imported from your Zoho Books to Hector. We have added a way to distinguished between parts and places, since both can be assigned to loaners in Hector, which you will see in more detail in the “In depth” part of the guide.
Invoices
Finally, Zoho Books invoices are created directly from your Hector loaners. Only loaners made using the items imported from Zoho Books will be converted into invoices. If you have set up penalties in Hector, those will also appear in the invoice.
2. Setup & In Depth Explanation
This part focus on the setup part of the integration, both on Zoho Books and Hector. We will also try to answer every question you might have about the configuration process. Here are the steps we would recommend you follow.
2.1. Item Creation
Item creation is performed in Zoho Books, so you can access your Zoho organization with an account that has the necessary privileges. Hector parts are going to be imported from the “Items” tab on the menu. This is important because items in Zoho Books are assigned to the corresponding General Ledger accounts and Hector is not aware of this information.
Here is how a Zoho Books item is converted in an Hector part
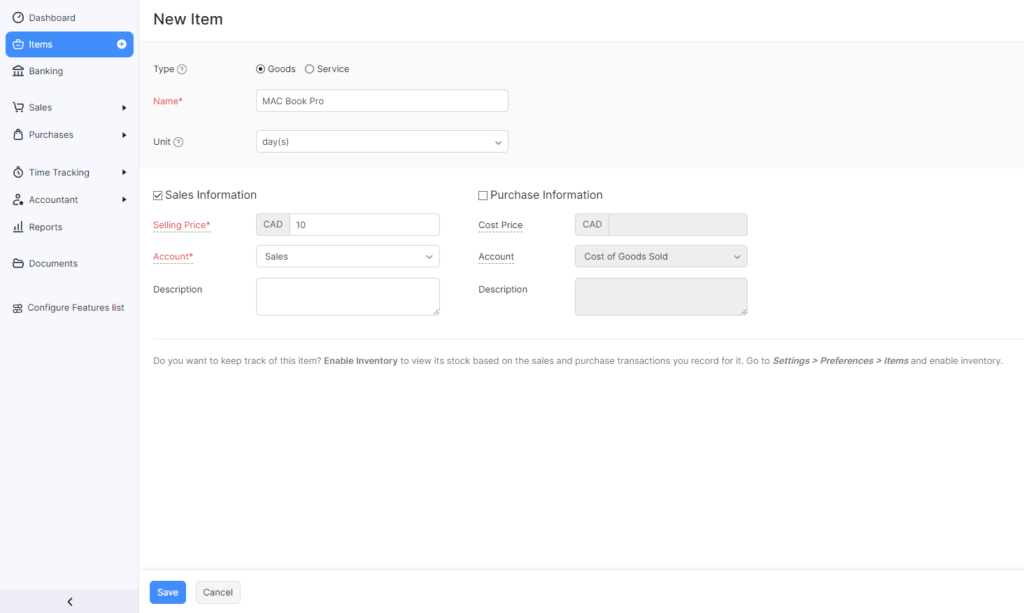
- Type: Not used
- Name: Description of the part
- Unit: Not used in parts, but will appear in the invoice. Used for place creation which we will show you after if you have places/rooms included in loaners.
- Sales Information & Purchase information: Not used in Hector, but the selling price is used when creating the invoice line.
Here is how a Zoho Books item is converted into an Hector place
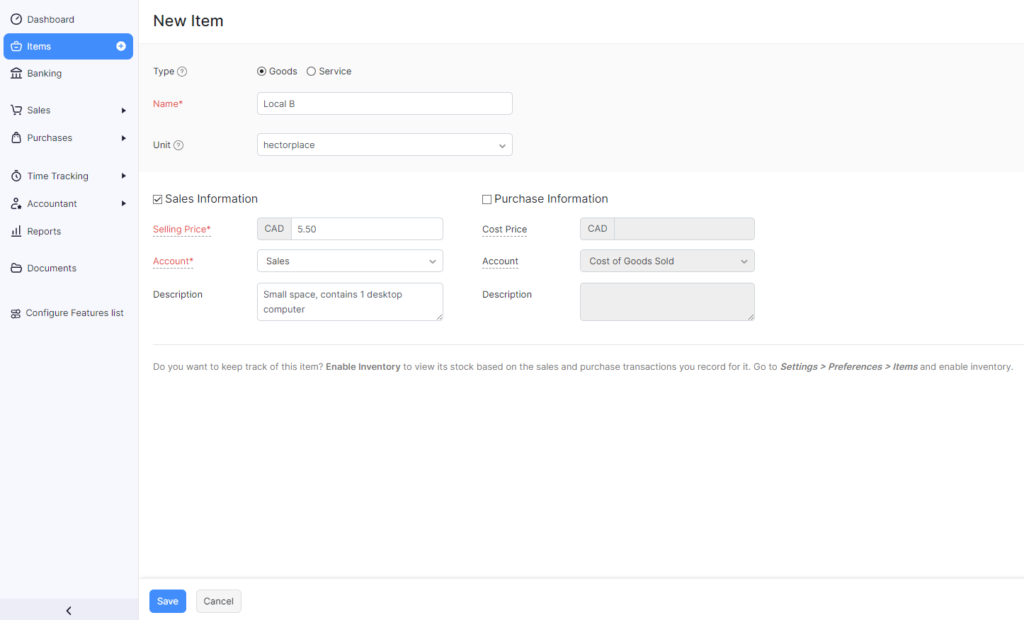
- Type: Not used
- Name: Name of the place
- Unit: MUST BE “hectorplace” (This can be removed once the importation is completed)
- Sales Information & Purchase information: Not used in Hector, but the selling price is used when creating the invoice line.
2.2. Important Information
The next step is to take note of some important information you are going to need to make the connection between Zoho and Hector.
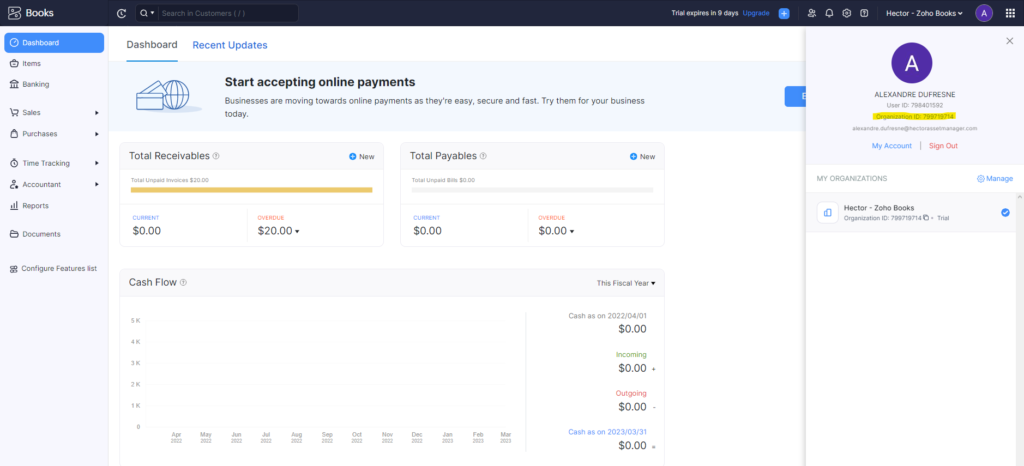
First information we will take note of is the Organization ID. Simply click on your profile in the top right of Zoho Books and it will be under your name.
Secondly you need to note the Domain. Since Zoho Books is hosted on different domains, Hector needs to know which on you are on. The domain should be the .com that appear in the URL of your Zoho Books app.

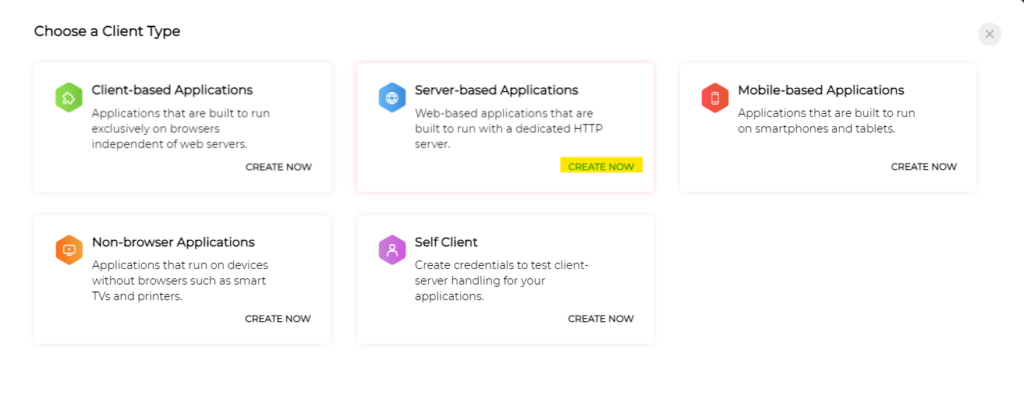
Next step is to create a Zoho application in order to get a Client ID and a Secret. For this, you will need to go to the console. From there, you can create a new client and choose the option “Server-based Applications”.
You then need to fill the form for the creation of a new client.
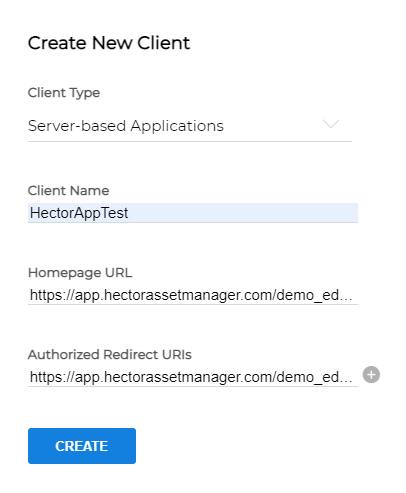
- Client Name: Name of your choice. You should be able to see clearly that it is this integration.
- Homepage URL: The homepage URL of your Hector instance. For example:
- https://app.hectorassetmanager.com/{{YourInstance}}
- https://eu10.hectorassetmanager.com/{{YourInstance}}
- Replace the {{YourInstance}} by the name of your Hector instance URL
- Authorized Redirect URIs: Similar to the last one but with more info on the URL. This is where Hector will receive the information about the connection once it’s established
- https://app.hectorassetmanager.com/{{YourInstance}}/settings/integration/list
- https://eu10.hectorassetmanager.com/{{YourInstance}}/settings/integration/list
- Replace the {{YourInstance}} by the name of your Hector instance URL
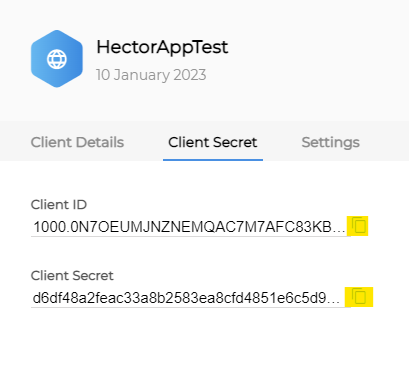
- Press “Create” once all the info is entered. You should be redirected to the tab containing the Client ID and the Secret of this application. Take note of them for later.
2.3. Hector Pre-Setup
Before entering all the information you just retrieved in Hector, you will need at least one category and one stockroom in Hector.
For the category, we recommend naming a category with a name referring to Zoho Books. When items are imported from Zoho Books, they are all going to be placed inside one category of your choosing. Then, we recommend you change the category of the part after the initial import.
The stockroom on the other hand can be a permanent choice. Since the final goal of the integration is to link loaners to invoices, the stockroom should have the loaners activated on it.
2.4. Hector Integration Setup
You are finally ready to enter all the information gathered above, and choose even more customization for the integration.
First, navigate to Settings > Integrations on the menu, then click on the Loaners category.
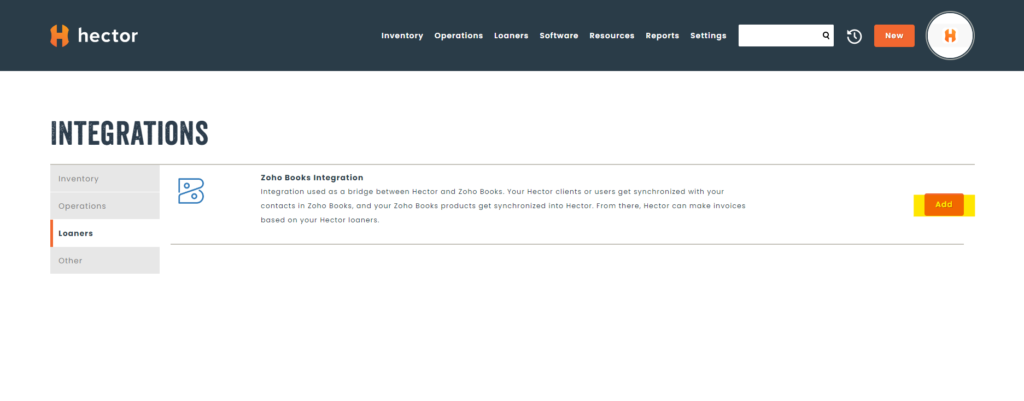
After finding the Zoho Books integration and clicking the Add button, you will be redirected to a page where you should see a lot of familiar fields.
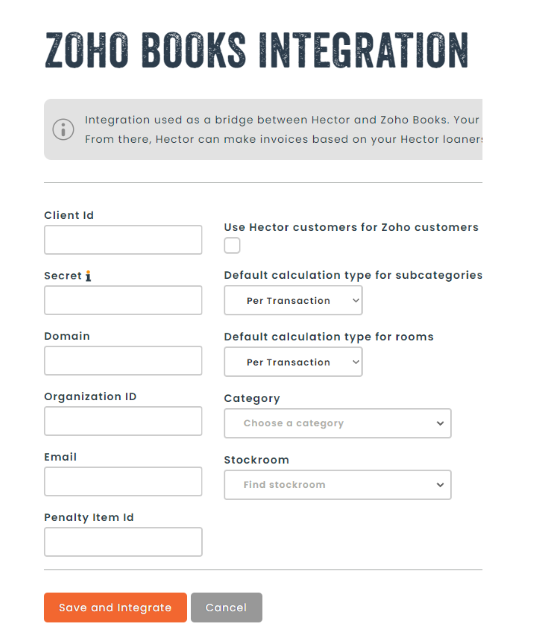
The purpose of each field is documented below.
- Client Id: The Client ID retrieved earlier. Used for connection.
- Secret: The Secret retrieved earlier. Used for connection.
- Domain: The domain retrieved earlier. Used to perform request to the right servers. Don’t forget to add the “.”.
- Organization ID: The Organization ID retrieved earlier. Use to perform the request on the right organization.
- Email: Since there is a limit on the number of requests that can be made to the Zoho Books API, there is a possibility that this limit can be reached and the integration stops working. If you wish to receive an email to inform you every time this happens, simply enter an email here. You can also leave it empty if you don’t wish to be informed.
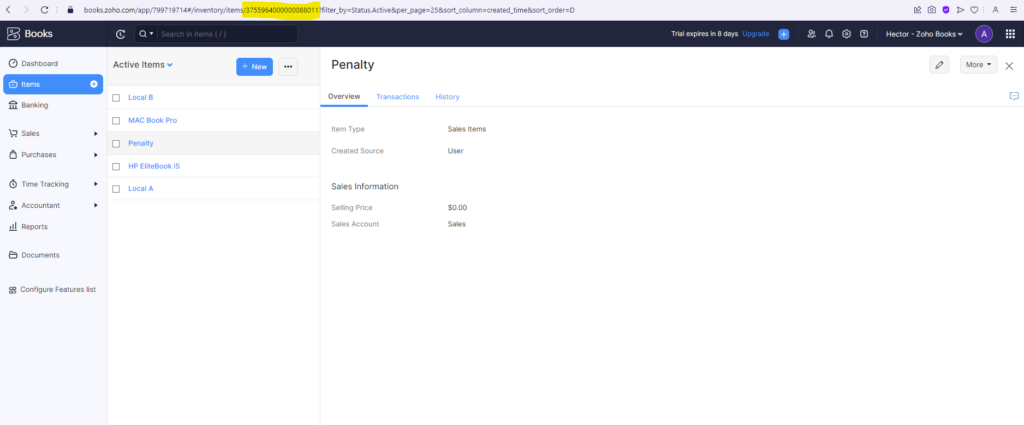
- Penalty Item Id: As mentioned above, you can also connect your loaner penalties in this integration. To do so, you will need to create an additional item in your Zoho Books app. You can simply name this item “Penalty” or something clear for you. Once created, click as to see the new item you created and you will see it’s ID in the URL. This is the value you will need to enter for Penalty Item Id if you wish to connect the penalties to the integration. You can also leave it blank.
- Use Hector customers for Zoho customers: If checked, the Hector customers will be used for the integration and imported into your Zoho, otherwise it will be your Hector users.
- Purchase account Id: If you export your parts from Hector, you can specify a sales account to give the parts. To do so, find your account in your “Chart of Accounts” and copy the ID from the URL.

- Default Calculation Type for Parts: You can choose how to do the calculation by default for every part. This will influenced the quantity that appears in an invoice depending on the length of the loan, or simply keep the normal quantity if “Per transaction” is chosen. When a part will be imported, an new attribute for the calculation type will be attached to it with this value by default. This means that you can still customize it for every part if you don’t want all of them to use the same calculation type
- Default Calculation Type for Places: Same as parts, but with places.
- Category: The initial category in which the parts items are going to be created.
- Stockroom: The default stockroom in which the parts and places are going to be affected.
Once all the information is filled, you can click the “Save and Integrate” button. This will redirect you to a page of confirmation for Zoho. Make sure you are connected on an account that is part of the organization you are trying to link and press the “Accept” button.
2.5 Additional Information
Here are some things you will need to know before continuing.
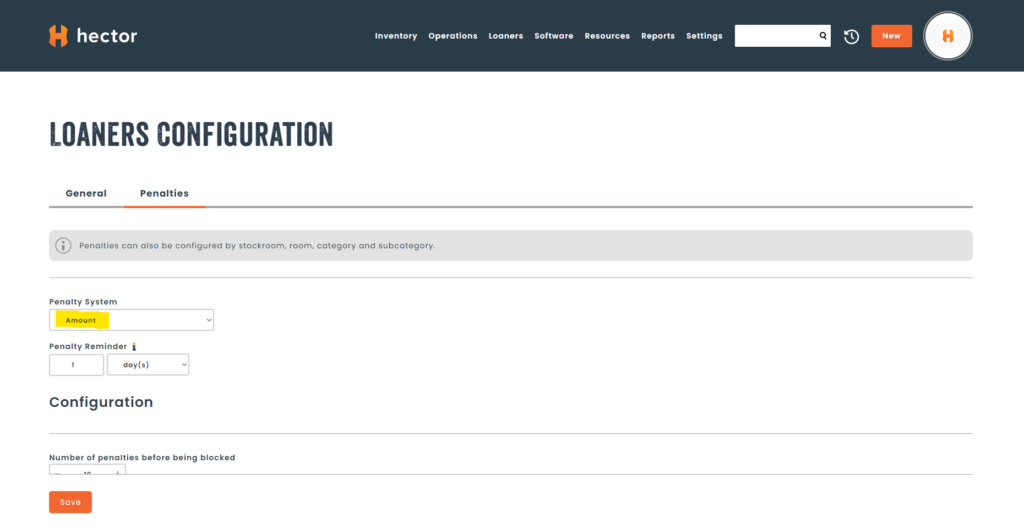
Loaner Penalties can be configured in Settings > Loaners > Penalties, and will only work if the chosen penalty system is “Amount”
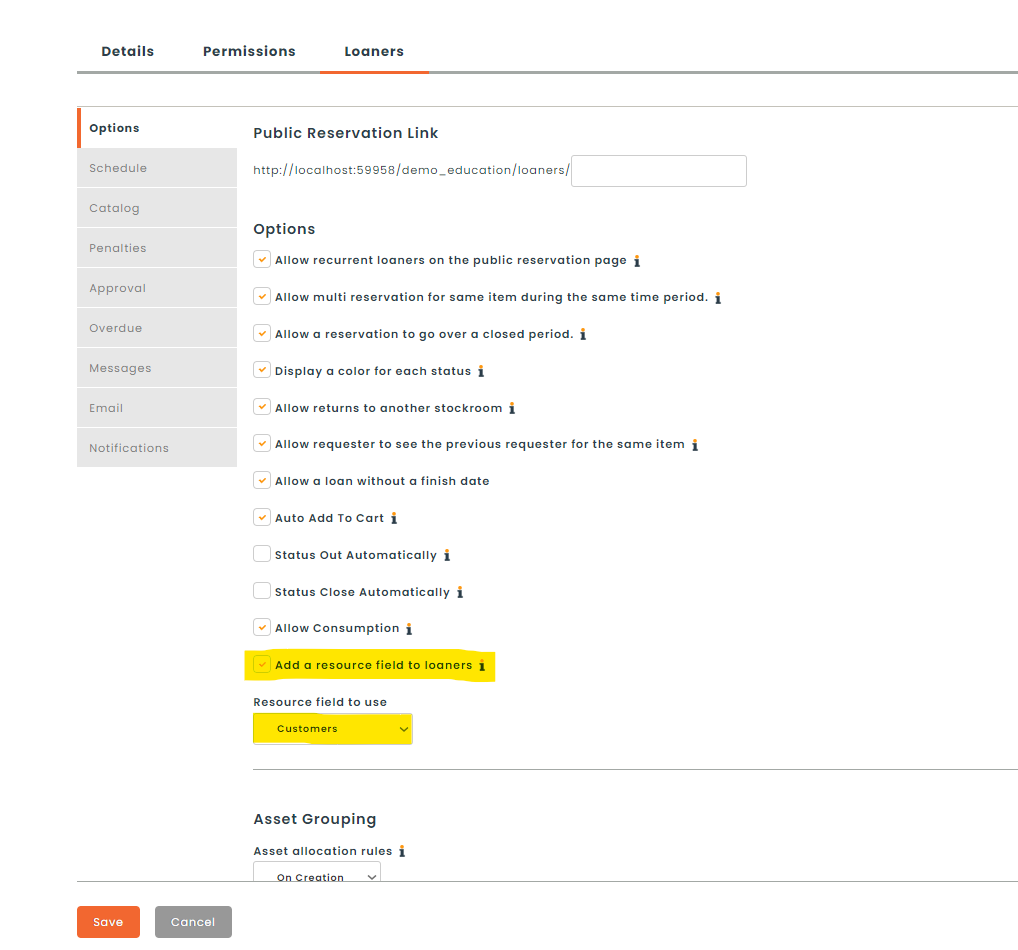
If you choose customers as your resource for the integration, you will need to activate them on your stockroom. To do so, go to edit page of your stockroom in the section Loaners > Options and check the option “Add a resource field to loaners”. A new selector will appear under it, chose “Customer”.
Finally, remember that only parts are imported into Hector from Zoho Books. You will need to create assets for the parts and assign parts to the right categories, otherwise you won’t have any assets to make reservations on.
3. Usage
You have now completed the setup part of the guide. Here is an example of what you should happen if everything was configured correctly.
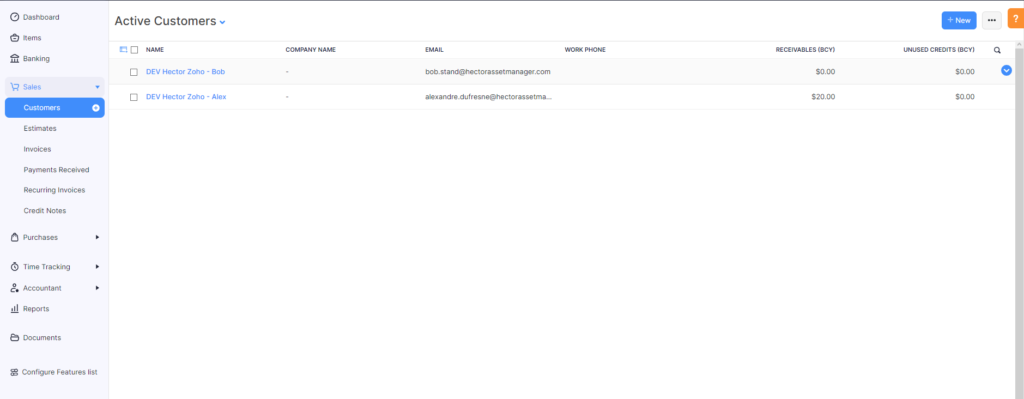
For this example, customers were selected as the main resource, soHector customers have been imported in Zoho Books:

Now when a loaner is created, we will select one of these two customers, an invoice will be created once the loaner is completed in Hector.
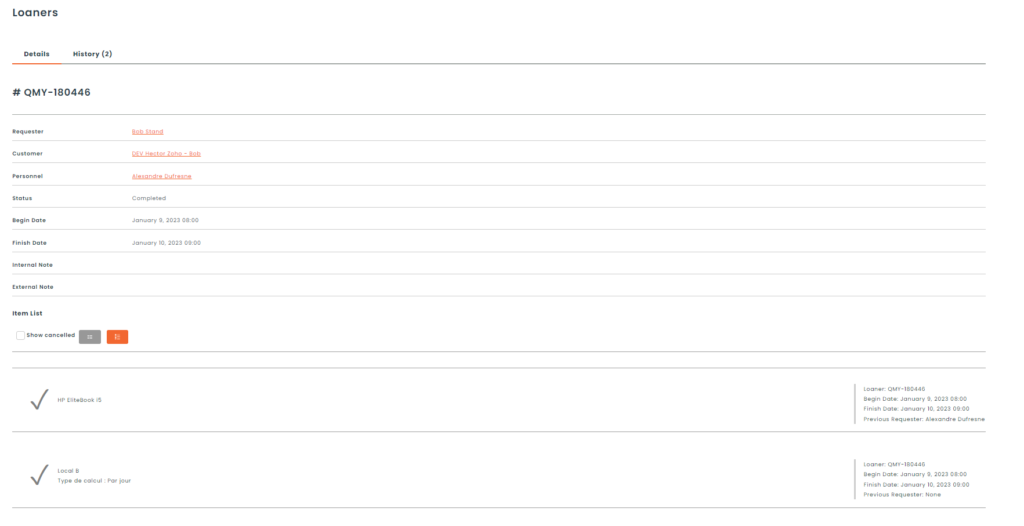
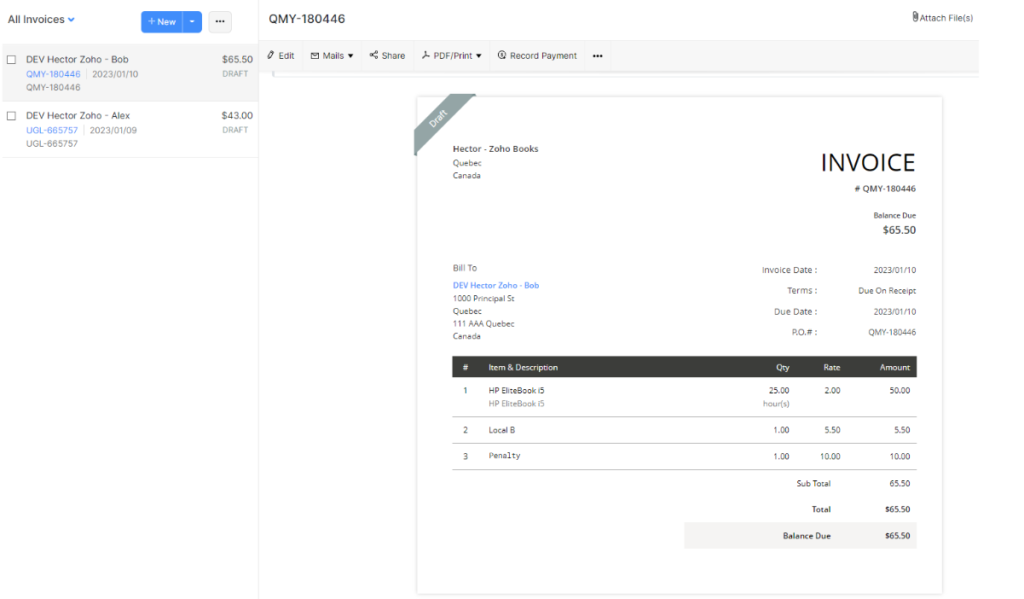
This loaner was returned late so there is a penalty attached to it. The Local B has a calculation type of “Per transaction” so its quantity is 1 because it was loaned once. The HP EliteBook on the other hand has a calculation type of “By hour” so his quantity is 25 (25 hours multiplied by 1 transaction. Could be more than 1 if lot size are activated on the category)
This wraps up our Zoho Books integration guide. Please contact our team if you have any questions or need help setting up Zoho in your environment!