The clock is ticking: Windows 10 will reach its end of life in October, and organizations must transition to Windows 11. For IT professionals managing a large inventory of computers, the process can seem daunting. Questions like these may arise:
- Which devices in your inventory currently run Windows 10?
- How do you efficiently migrate them all to Windows 11?
Don’t worry—this guide is here to help you successfully migrate to Microsoft’s new windows operating system while ensuring a smooth transition for your organization.
Step 1: Know Your Inventory
Why an Inventory Is Critical
Before tackling the migration, you need a detailed inventory of your IT infrastructure. Knowing which devices run Windows 10 and their specifications is crucial to determine their compatibility with Windows 11. A comprehensive inventory helps identify:
- Devices that meet the minimum system requirements.
- Systems needing hardware upgrades.
- Legacy systems that may need replacement.
Use an Automated IT Inventory Management System (Like Hector)
Manual tracking of devices is impractical, especially in large organizations. Automated tools like Hector can streamline the process by:
- Cataloging operating systems, including existing Windows versions.
- Identifying hardware configurations such as CPU type, RAM, and SSD storage.
- Highlighting devices that lack required features like TPM 2.0 or Secure Boot.
By leveraging an automated IT inventory tool, you can save time, reduce errors, and ensure no devices are overlooked.
On top of that, each time you’ll need to upgrade windows or make any changes in the future, you’ll already have all the information you need on hand and up to date.
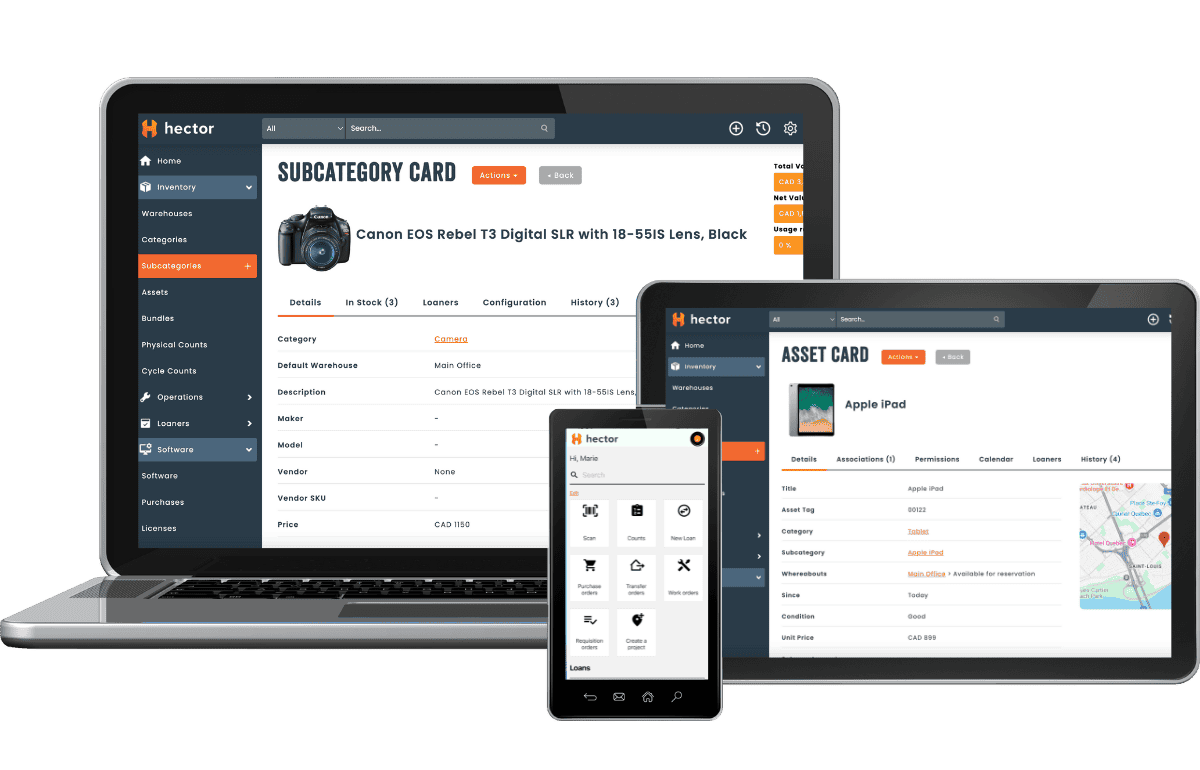
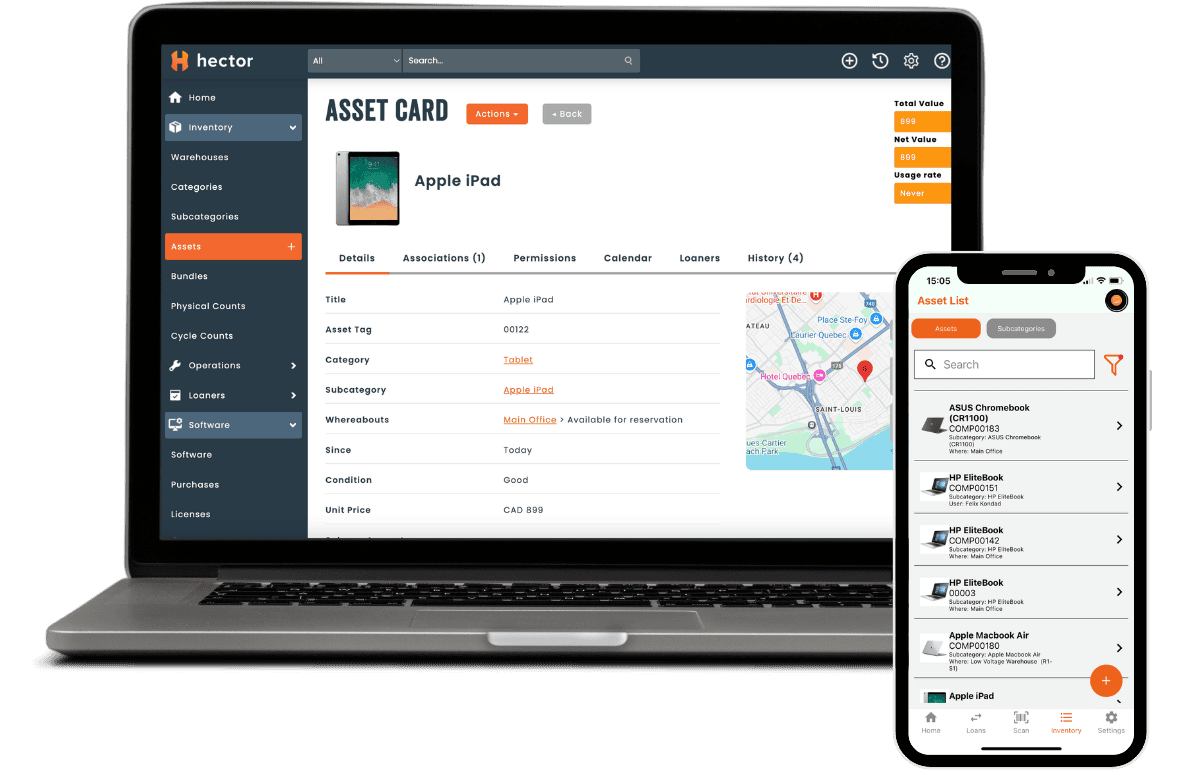
Here’s how to see which assets use Windows 10 in your Hector Inventory.
1. The first option is simply to open any asset card on your Hector inventory. There, you can very easily see which operating systems are in use for each of your computers.

2. You can also easily export reports of all your assets by operating system. This way you have a complete list of all the computers impacted by the migration.
All you have to do is go to your inventory reports, then click integration, and operating system. It’s as easy as that. If need be, you can add filters so you only see computers in one specific location, or specific models for example.

If you want your inventory to be that easily accessible, try hector for free.
Step 2: Analyze Which Computers Currently Use Windows 10
Evaluate Compatibility
With your IT inventory in hand, identify which devices are running Windows 10 and evaluate their ability to run Windows 11. Microsoft has outlined specific minimum hardware requirements, including:
- Trusted Platform Module (TPM) 2.0: Ensures enhanced security for the new operating system.
- Secure Boot Capability: Protects against malware attacks during startup.
- UEFI Firmware: Replaces the older BIOS standard for modern systems.
- Supported CPUs: Devices must have Intel or AMD processors with required cores.
- Storage Requirements: Windows 11 requires a minimum of 64 GB, though SSDs are recommended for optimal performance.
Assess Critical Systems
Identify high-priority devices—such as servers, workstations, or laptops for key personnel—that may need immediate attention. Consider:
- Systems running critical applications.
- Devices with custom configurations.
- Remote systems used by employees working from home.
Address Hardware Upgrades or Replacements
For devices that don’t meet the minimum system requirements, you may need to:
- Upgrade hardware components, such as installing an SSD or adding more RAM.
- Replace older devices with new PCs that come pre-installed with Windows 11.
Step 3: Create a Windows 11 Migration Plan
Establish Clear Objectives
A detailed migration plan ensures a smooth transition. Address these areas:
- Scope: Define the total number of devices to upgrade (your inventory should help with that part).
- Prioritization: Determine which devices or departments will be upgraded first.
- Timeline: Set milestones for each phase of the migration.
Account for Remote Workers
If your organization has employees using company computers at home, ensure the migration plan includes:
- Coordination for remote upgrades.
- Clear instructions for employees to use tools like the Installation Assistant or Media Creation Tool.
Communication and Training
Inform employees about:
- The reason why the company now has to install Windows 11.
- The benefits of using Windows 11 Pro.
- Potential disruptions during the upgrade process.
- Tutorials and FAQs for navigating the new operating system.
Step 4: Back Up, Back Up, Back Up
Data loss can severely impact business operations. Backing up data ensures that, in the event of an issue during migration, no critical information is lost.
Backup Methods
- Cloud Storage: Use services like OneDrive to back up user files and settings automatically.
- External Drives: Save critical data on external SSDs or HDDs for added security.
- Network Backups: Leverage centralized servers to back up multiple devices simultaneously.
Test and Validate Backups
Before proceeding, test the backups to ensure they are complete and restorable. This step is critical to avoid any unpleasant surprises during the migration process.
Step 5: Migrate Computers to Windows 11
Phased Migration Approach
Avoid upgrading all devices simultaneously. A phased approach minimizes risks and allows for troubleshooting as needed. For example, upgrade in batches based on:
- Departments.
- Device usage patterns.
- Hardware readiness.
Detailed Migration Steps
1. Run the PC Health Check App:
- Verify that each device meets Windows 11’s minimum hardware requirements.
2. Prepare Devices:
- Update all drivers to the latest versions.
- Ensure BIOS/UEFI settings enable Secure Boot and TPM 2.0.
3. Choose the Installation Method:
- Windows Update: Use this for straightforward upgrades on eligible devices.
- Installation Assistant: Download the tool from the Microsoft website for a guided installation process.
- ISO File: Use the Media Creation Tool to download Windows 11 ISO and create a bootable USB drive or flash drive.
4. Perform the Upgrade:
- Follow the steps provided by the installation media.
- Monitor the upgrade for potential issues, such as compatibility errors.
5. Post-Upgrade Validation:
- Verify that critical applications and settings are functioning correctly.
- Ensure employees can access their data and understand any changes.
Additional Considerations
Clean Install vs. Upgrade
For older systems or those with significant performance issues, consider performing a clean install of Windows 11. This ensures optimal performance and eliminates potential software conflicts.
Microsoft Account Integration
Some features in Windows 11, such as Microsoft Store access and OneDrive integration, require a Microsoft account. Ensure employees are prepared to use this feature effectively.
New Features in Windows 11
Windows 11 offers enhancements in productivity, security, and usability compared to the current Windows operating systems. Features like Snap Layouts and virtual desktops can streamline workflows, while advanced security protocols provide better data protection.
Managing Product Keys and Licensing
Ensure that each system has a valid product key for Windows 11. For organizations, volume licensing options can simplify the upgrade process. Validate all licenses through Microsoft to avoid disruptions.
Using Update & Security Features
Utilize the Update & Security settings in Windows to streamline upgrades. This section provides tools for downloading updates, checking for compatibility, and managing backups.
Getting the Most Out of Windows 11
Explore Free Upgrade Options
Microsoft offers a free upgrade to Windows 11 for eligible devices currently running Windows 10. Use the Get Windows tool to check eligibility and start the process.
Utilize the Right Tools
- Installation Assistant: Ideal for guided upgrades.
- Media Creation Tool: For creating installation media, such as a bootable USB drive or ISO file.
Advanced BIOS and Firmware Updates
Before upgrading, ensure that each device’s firmware and BIOS are updated to support Secure Boot and TPM 2.0. Check with hardware vendors for the latest updates.
Conclusion
Migrating from Windows 10 to Windows 11 doesn’t have to be overwhelming. By planning carefully, leveraging tools like the PC Health Check App and Media Creation Tool, and taking a phased approach, you can ensure a seamless transition. With backups in place, a clear migration plan, and proper communication, your organization will be ready to run Windows 11 efficiently and securely.
Embrace the future of Microsoft Windows and take full advantage of the powerful features in this new version of Windows. With a little preparation and the right tools, your migration process can be smooth, efficient, and worry-free.